PretensT
Tensegrity is a special kind of structure made of push and pull.
Project maintained by elastic-interval Hosted on GitHub Pages — Theme by mattgraham
A few hundred dollars!
I took the plunge and bought a fairly cheap 3D printer, to see if I could make tensegrity construction better and easier.
These devices are amazing! I got a Creality Ender 3 V2 and some PLA filament, put it together in a few hours, and printed out a few designs that I could download.
A bolt cap design?
While spending countless hours building tensegrities with my techniques based on off-the-shelf parts, I had lots of meditative time over the past months imagining what kind of shapes might make things better.
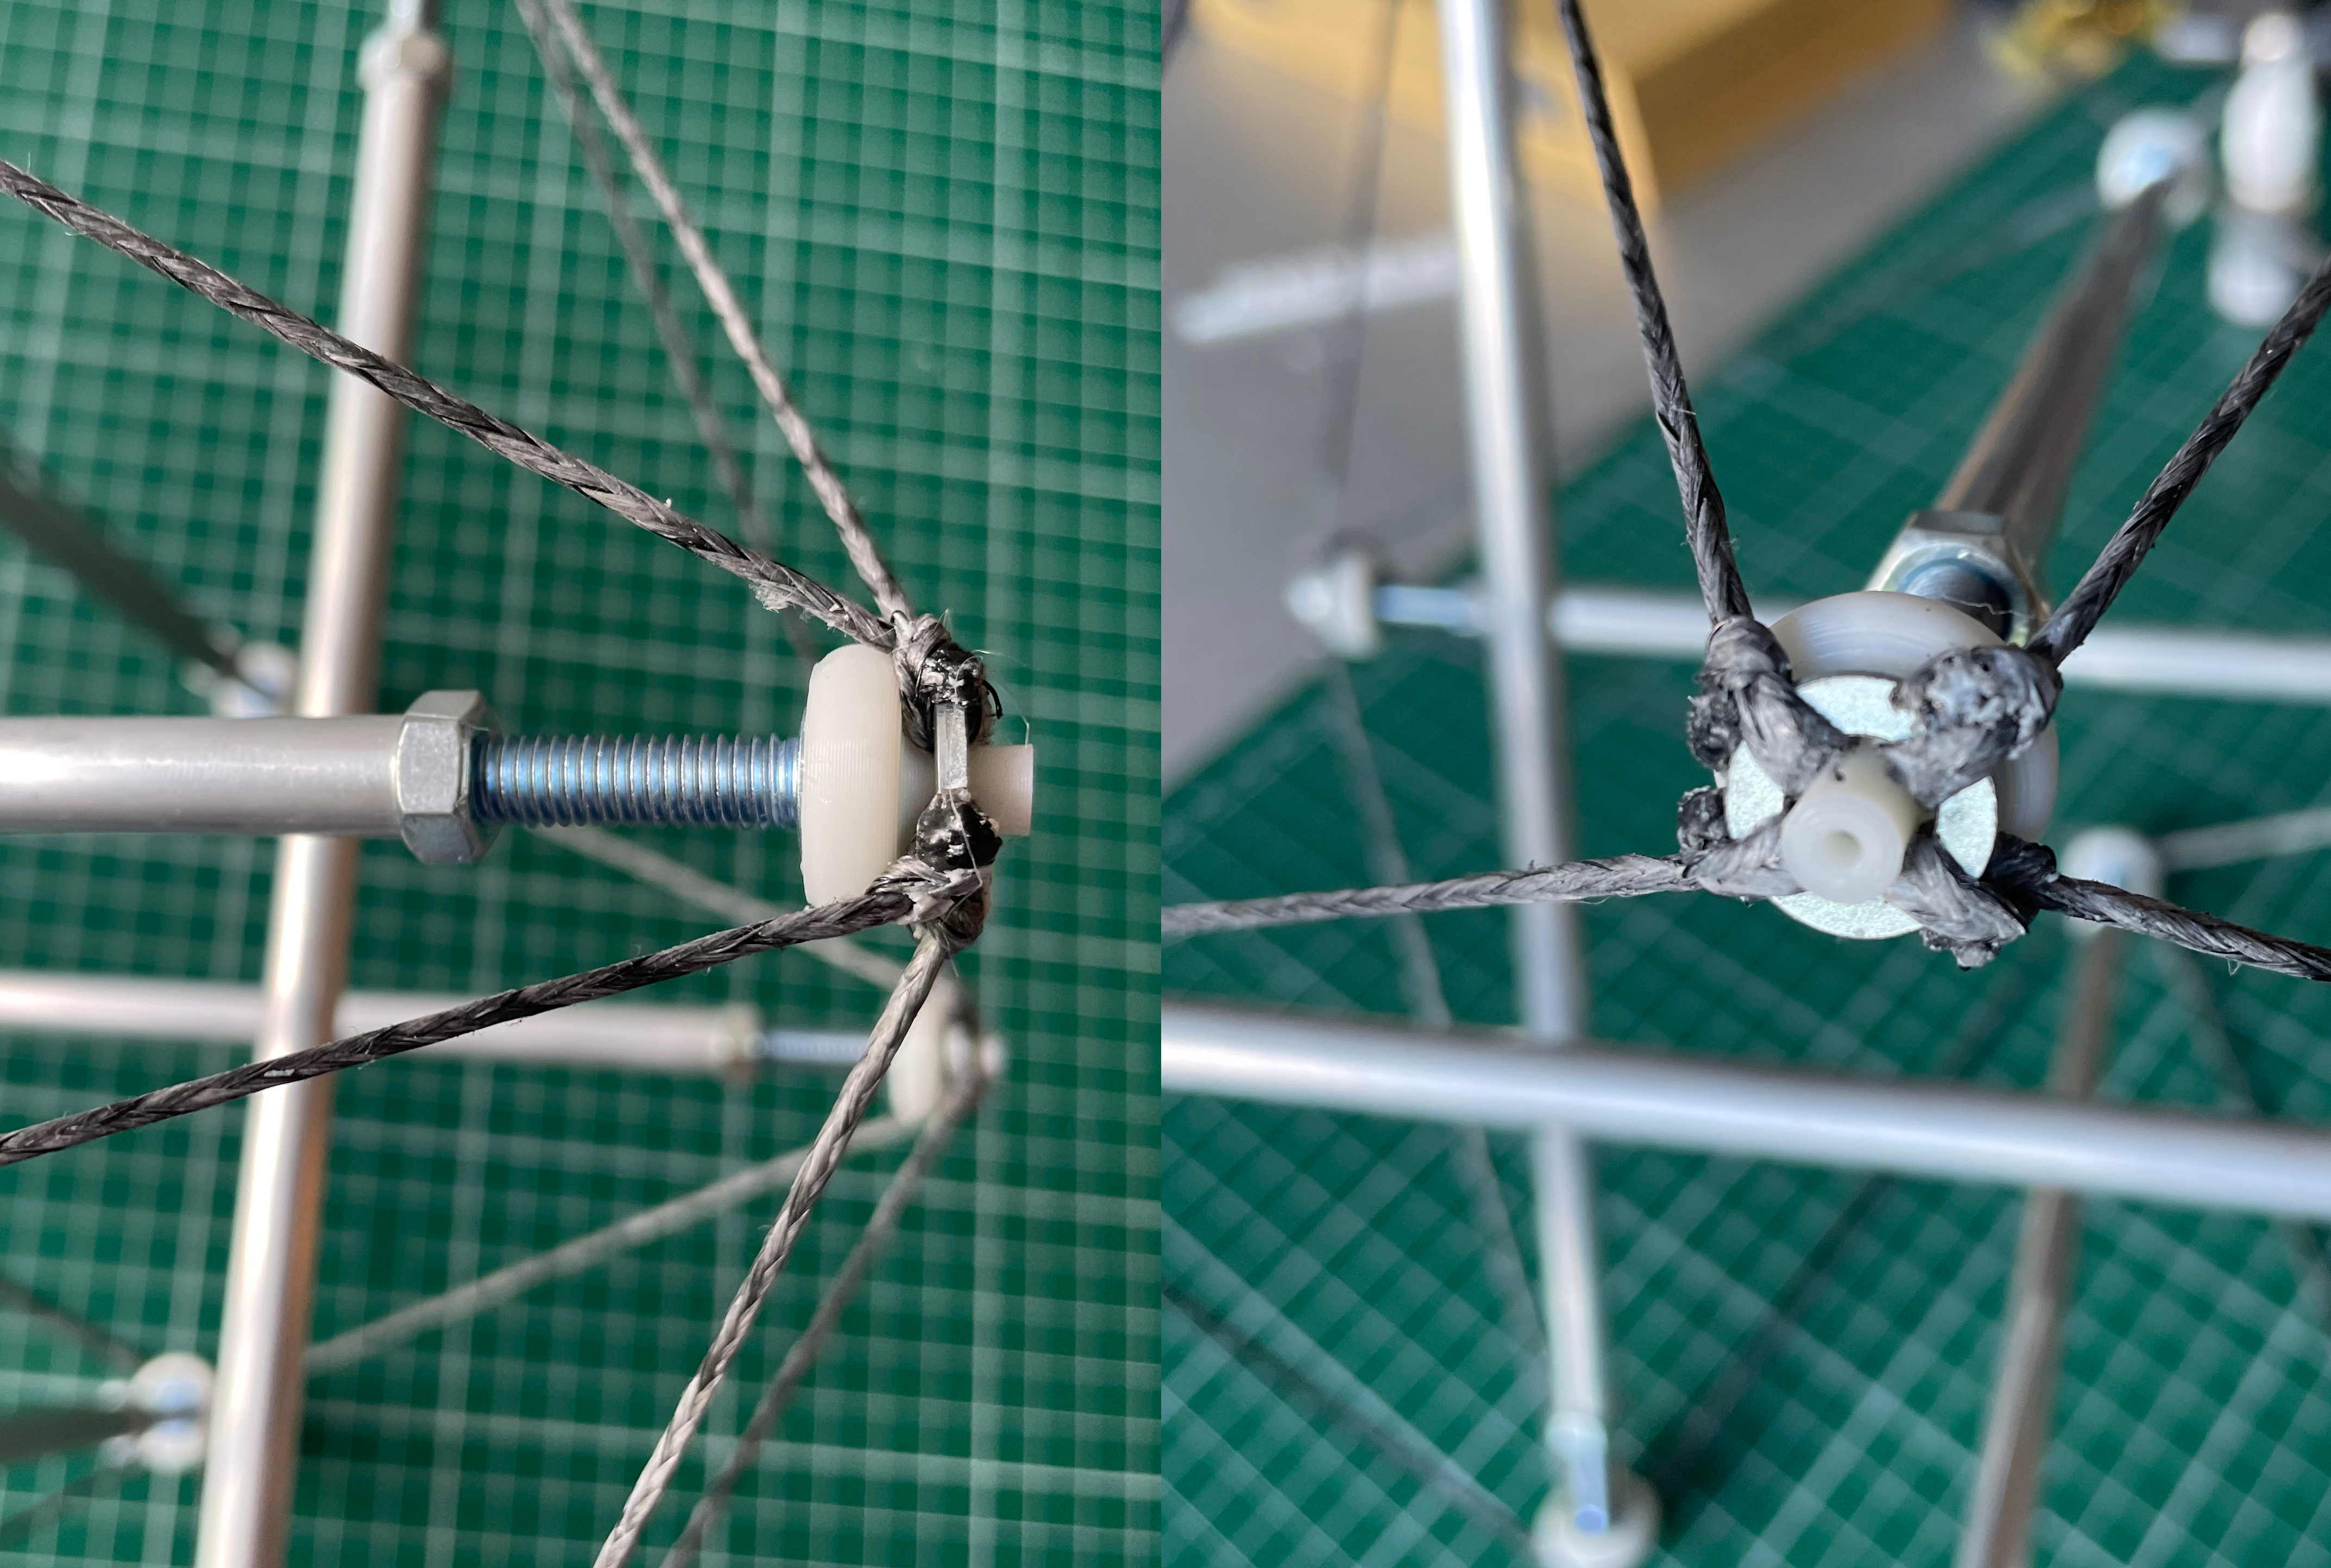
This is the anatomy of every compression-tension connection that I have been making for the past year or so:
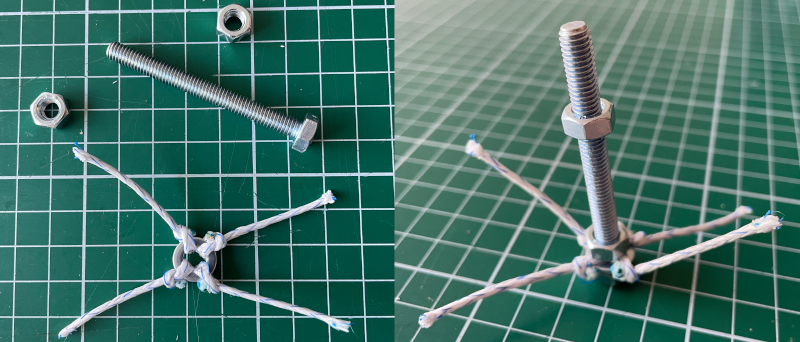
I’ve always thought that I could simplify things if I could shift them around so that the ring ends up on top rather than held in place under the bolt head by another nut.
I learned how to use Fusion 360 by watching a few tutorials and practicing, and then I was ready to embark on inventing my own design.
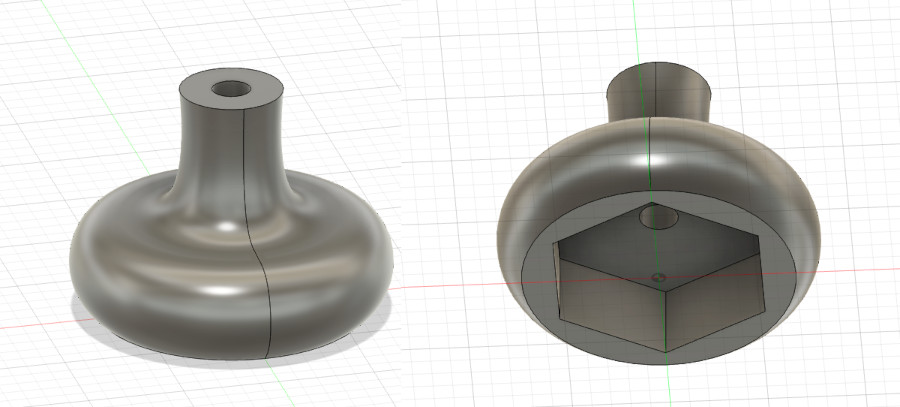
Once I got this design right, I imported into Cura slicer to generate the 3D printer instructions.
A new component: Push Bolt!
A mere ten minutes later I had my first cap printed, and with a dab from a glue gun and we have an entirely new component: the push bolt.
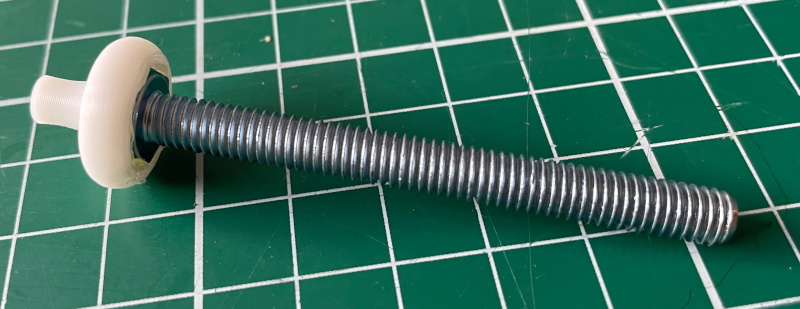
That allows me to use one less nut for the complete connection!
As you can see, the ring with cords now rides above the head of the bolt rather than below.

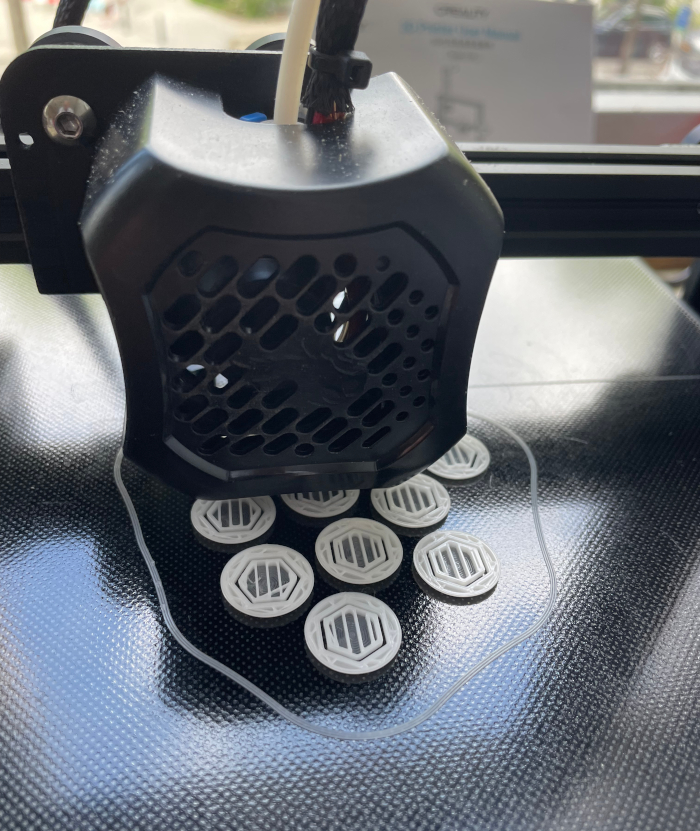
The slicer program has a wonderful function called multiply where you can have it make a number of the same thing during the same print, so I could let it work a while in my absence on 12 of them.
Conclusion
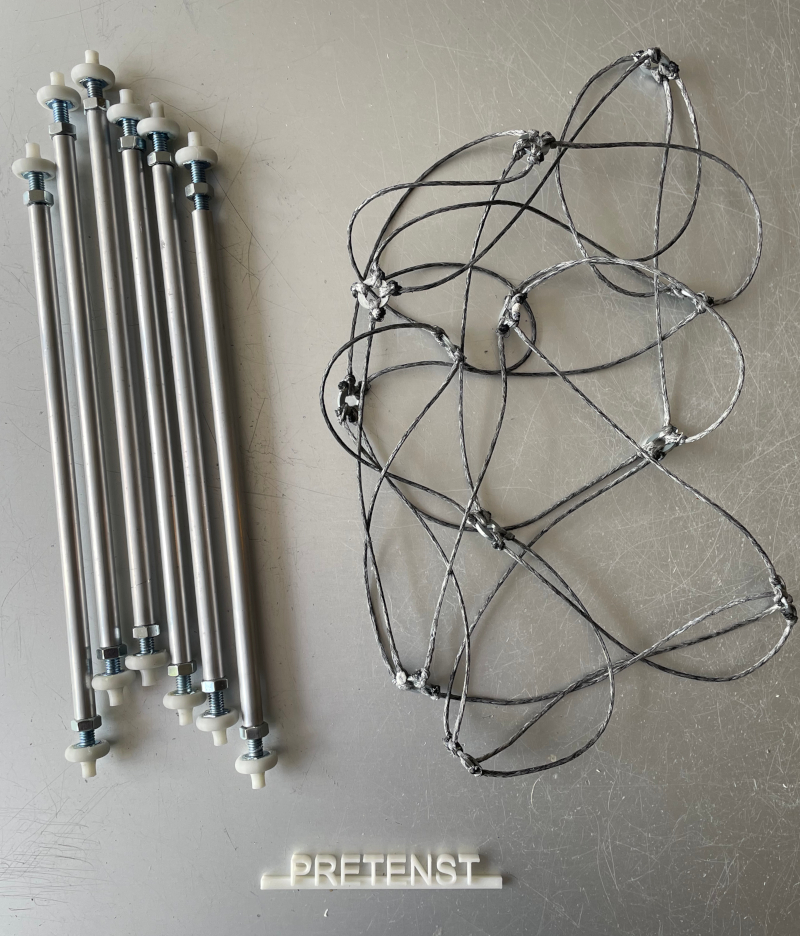
This was amazing! It only took a tiny little cap structure to transform a bolt into a push bolt and change the whole character of the construction process.
It is so much easier to build this way because you can pre-fabricate the tension (cords and rings) separately, and insert pre-assembled extensible bars with the new cap at either end.
You just slip the ring over the point of the cap and it stays, and no longer pinches the cord like before.
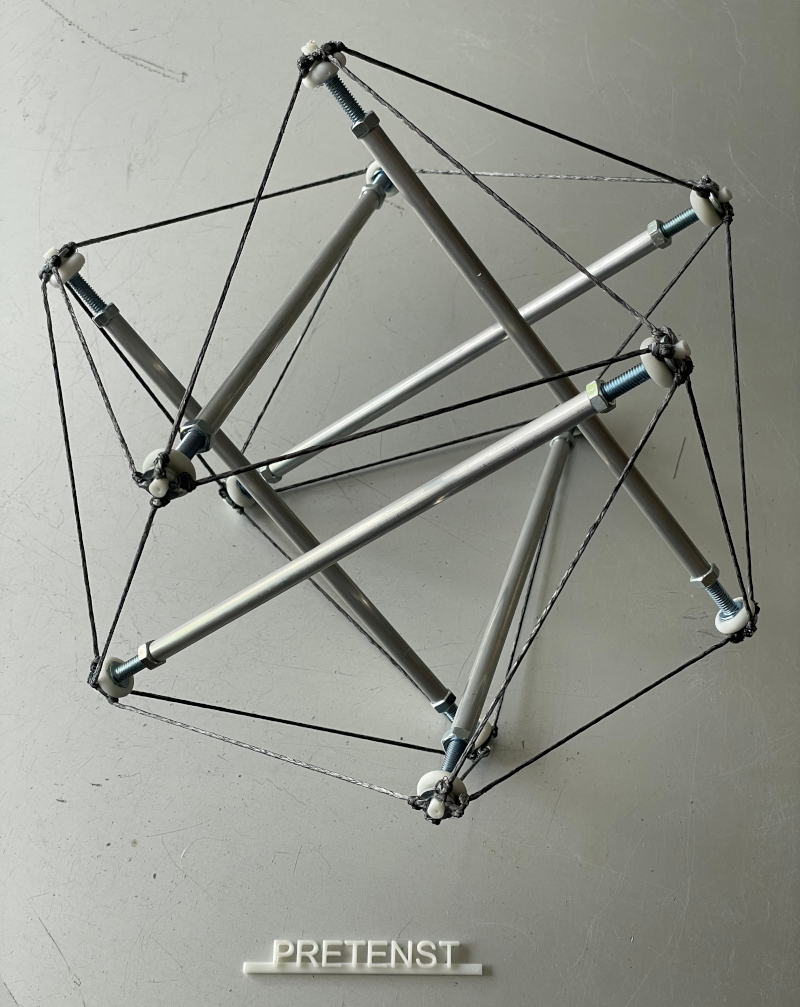
Add it all together and this feels like a really refreshing innovation over the technique I was previously using.
Even better (very educational!), you can now separate compression and tension easily, effectively dissassembling and reassembling the tensegrity whenever you want because the rings are removable from the caps.
If you scroll up and look carefully, you will see that I also designed a little hole down the middle of the cap. The idea is to add something on top which covers up the knots altogether. This will be my next challenge.
Projects:
2024-07-23: "Bouncy Wooden Sphere": what you can do with a discarded bed2024-04-23: "Twisted Torque": tied into a permanent twist
2023-03-27: "Easy 30-Push Sphere": one simple element
2022-10-05: "Glass and LED": going big and colorful
2022-09-29: "Fascia": dancing with tensegrity
2022-08-30: "Mitosis": the four-three-two tensegrity
2022-08-04: "Push Bolts for the People": finalizing design and getting it out there
2022-06-22: "Head to Head Push Bolt": M5 and M6 bolts symbiosis
2022-05-30: "Hiding Knots": bump up the aesthetics
2022-05-25: "Innovation with 3D Printer": the push bolt
2021-12-02: "Headless Hug": breaking a rule for the sake of symmetry
2021-10-28: "Rebuilding the Halo": finally got it right
2021-10-20: "Convergence": growing and reconnecting
2021-07-27: "120-Strut Brass Bubble": taking the next step up in complexity
2021-05-26: "30-Strut Brass Bubble": bouncing spherical tensegrity
2021-04-08: "Bow Tie Tensegrity": better bend resistance
2021-03-29: "Six Twist Essential": what if more hands could see?!
2021-01-25: "Minimal Tensegrity": no more tension lines than absolutely necessary
2021-01-18: "Degrees of Freedom": first adjustable hybrid tensegrity
2021-01-11: "Fractal Experiment": a tensegrity of tensegrities
2020-12-09: "Axial Tension": pretensing what is already pretenst
2020-11-02: "Halo by Crane - Part 2": the strengthening
2020-10-26: "Halo by Crane - Part 1": assembly complete but strength lacking
2020-10-12: "Brass and Tulips": a tight and strong tensegrity tower
2020-08-10: "Prefab Tension Tower": the tower of eight twists
2020-07-27: "Elastic Bubble": building with elastic ease
2020-07-13: "The Twist Sisters": left-handed and right-handed
2020-07-06: "Radial Tension": Pulling towards the middle
2020-06-22: "Diamond of Tension": Four pulls for every push
2020-06-15: "Prefab Tension": Separating compression from tension