PretensT
Tensegrity is a special kind of structure made of push and pull.
Project maintained by elastic-interval Hosted on GitHub Pages — Theme by mattgraham
Glasstec trade show
Every once in a while the entire glass industry gathers together to show off and make deals, and this Glasstec is a big impressive event taking up about ten huge halls!
Personally, I had never really actually realized how huge the industry is (you realize when you look around you at all the glass and think for a minute, but..), and how important it is to all the players in the industry to put everything out there.
The size of the show, the size of the areas occupied by the largest players in the industry, and the sheer size of the equipment that they shipped over to put on display was overwhelming.
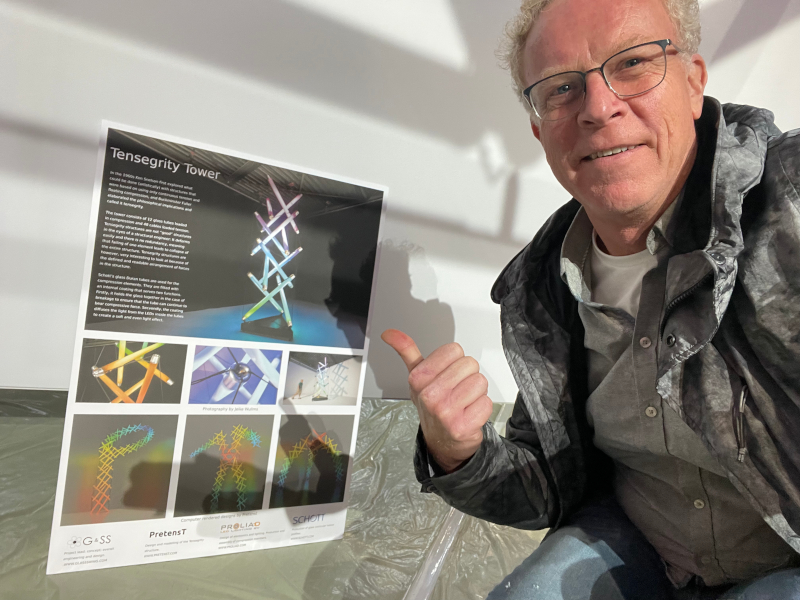
Our tensegrity display was commissioned by Schott AG, a German glass manufacturer, and it captured a good amount of attention.
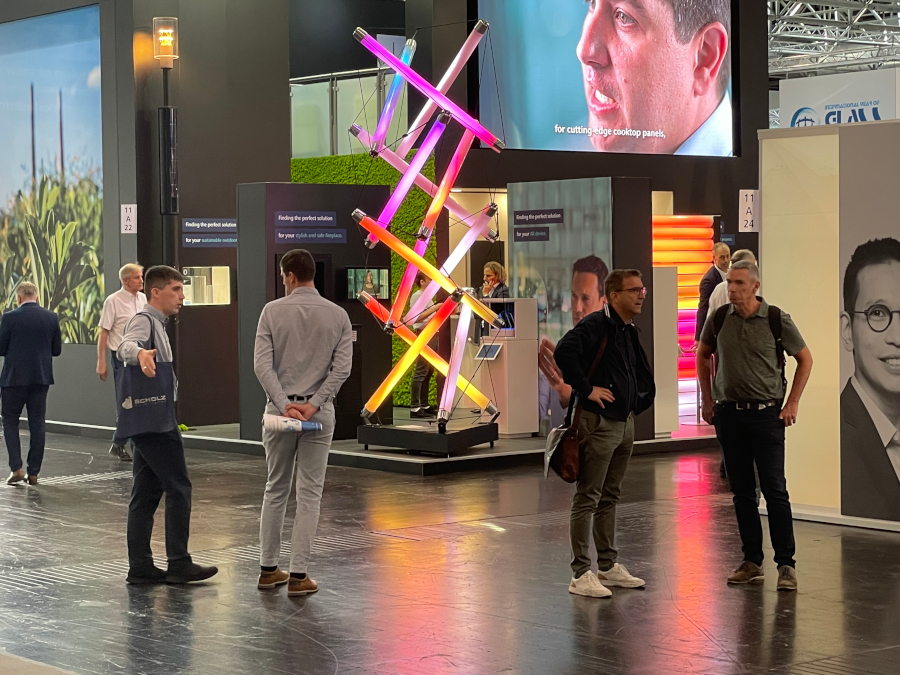
It changed color constantly and gradually, and it was an impressively big and heavy tensegrity.
But how did a structure like that come about?
It all started..
I have been tinkering (high-relevance research!) for a couple of years with tensegrity, both physically, and for many years virtually with the software I was always writing as a hobby.
My closest tensegrity friend Joël Keijnemans is a structural engineer by profession, so to him and others like him the structures that I have built so far are “models”.
We occasionally got together with another engineer Ate Snijder from the Technical University of Delft to talk some tensegrity, but to be interesting for civil engineers it had to be something physically bigger.
An opportunity came up early this year!
Ate Snijder has collaborated with Rob Nijsse also from Delft and set up a company Glass Swinging Structures to do innovative structural work, and they had done some work with Schott AG before building glass structures.
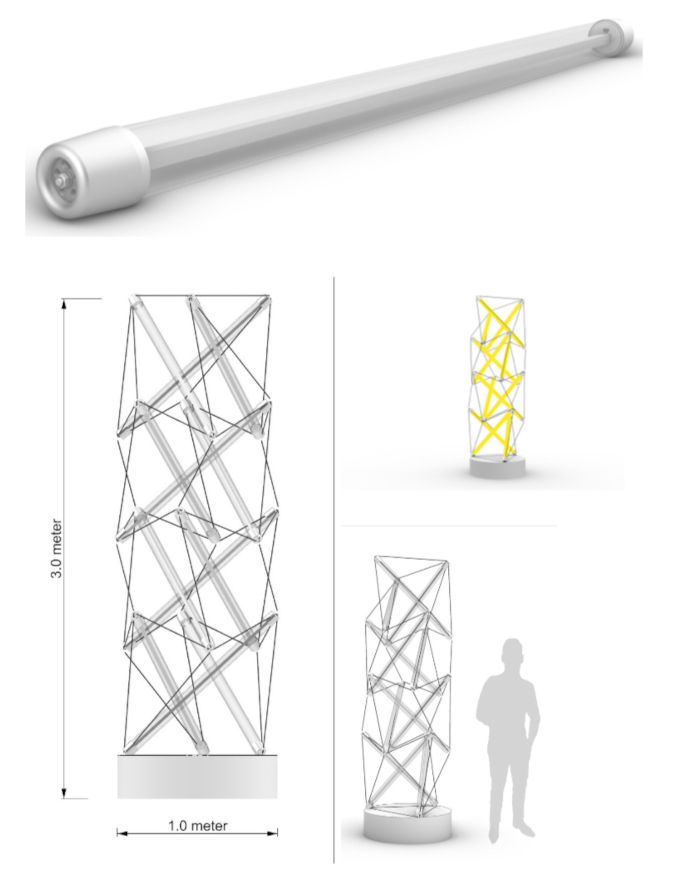
We proposed to Schott AG that we build a tensegrity from glass tubes filled with LEDs, and I used my PretensT App to design something just simple enough.
We arrived at a four-twist bow-tie tower, and originally we were planning to include an axia tension line down the middle.
What we actually really wanted was to have the axial tension line be connected to a force meter so that the color of the tower could react in real time with the movements, but that proved to be a bridge too far.
Later we decided to skip the axial tension line altogether for the purpose of the Glasstec show.
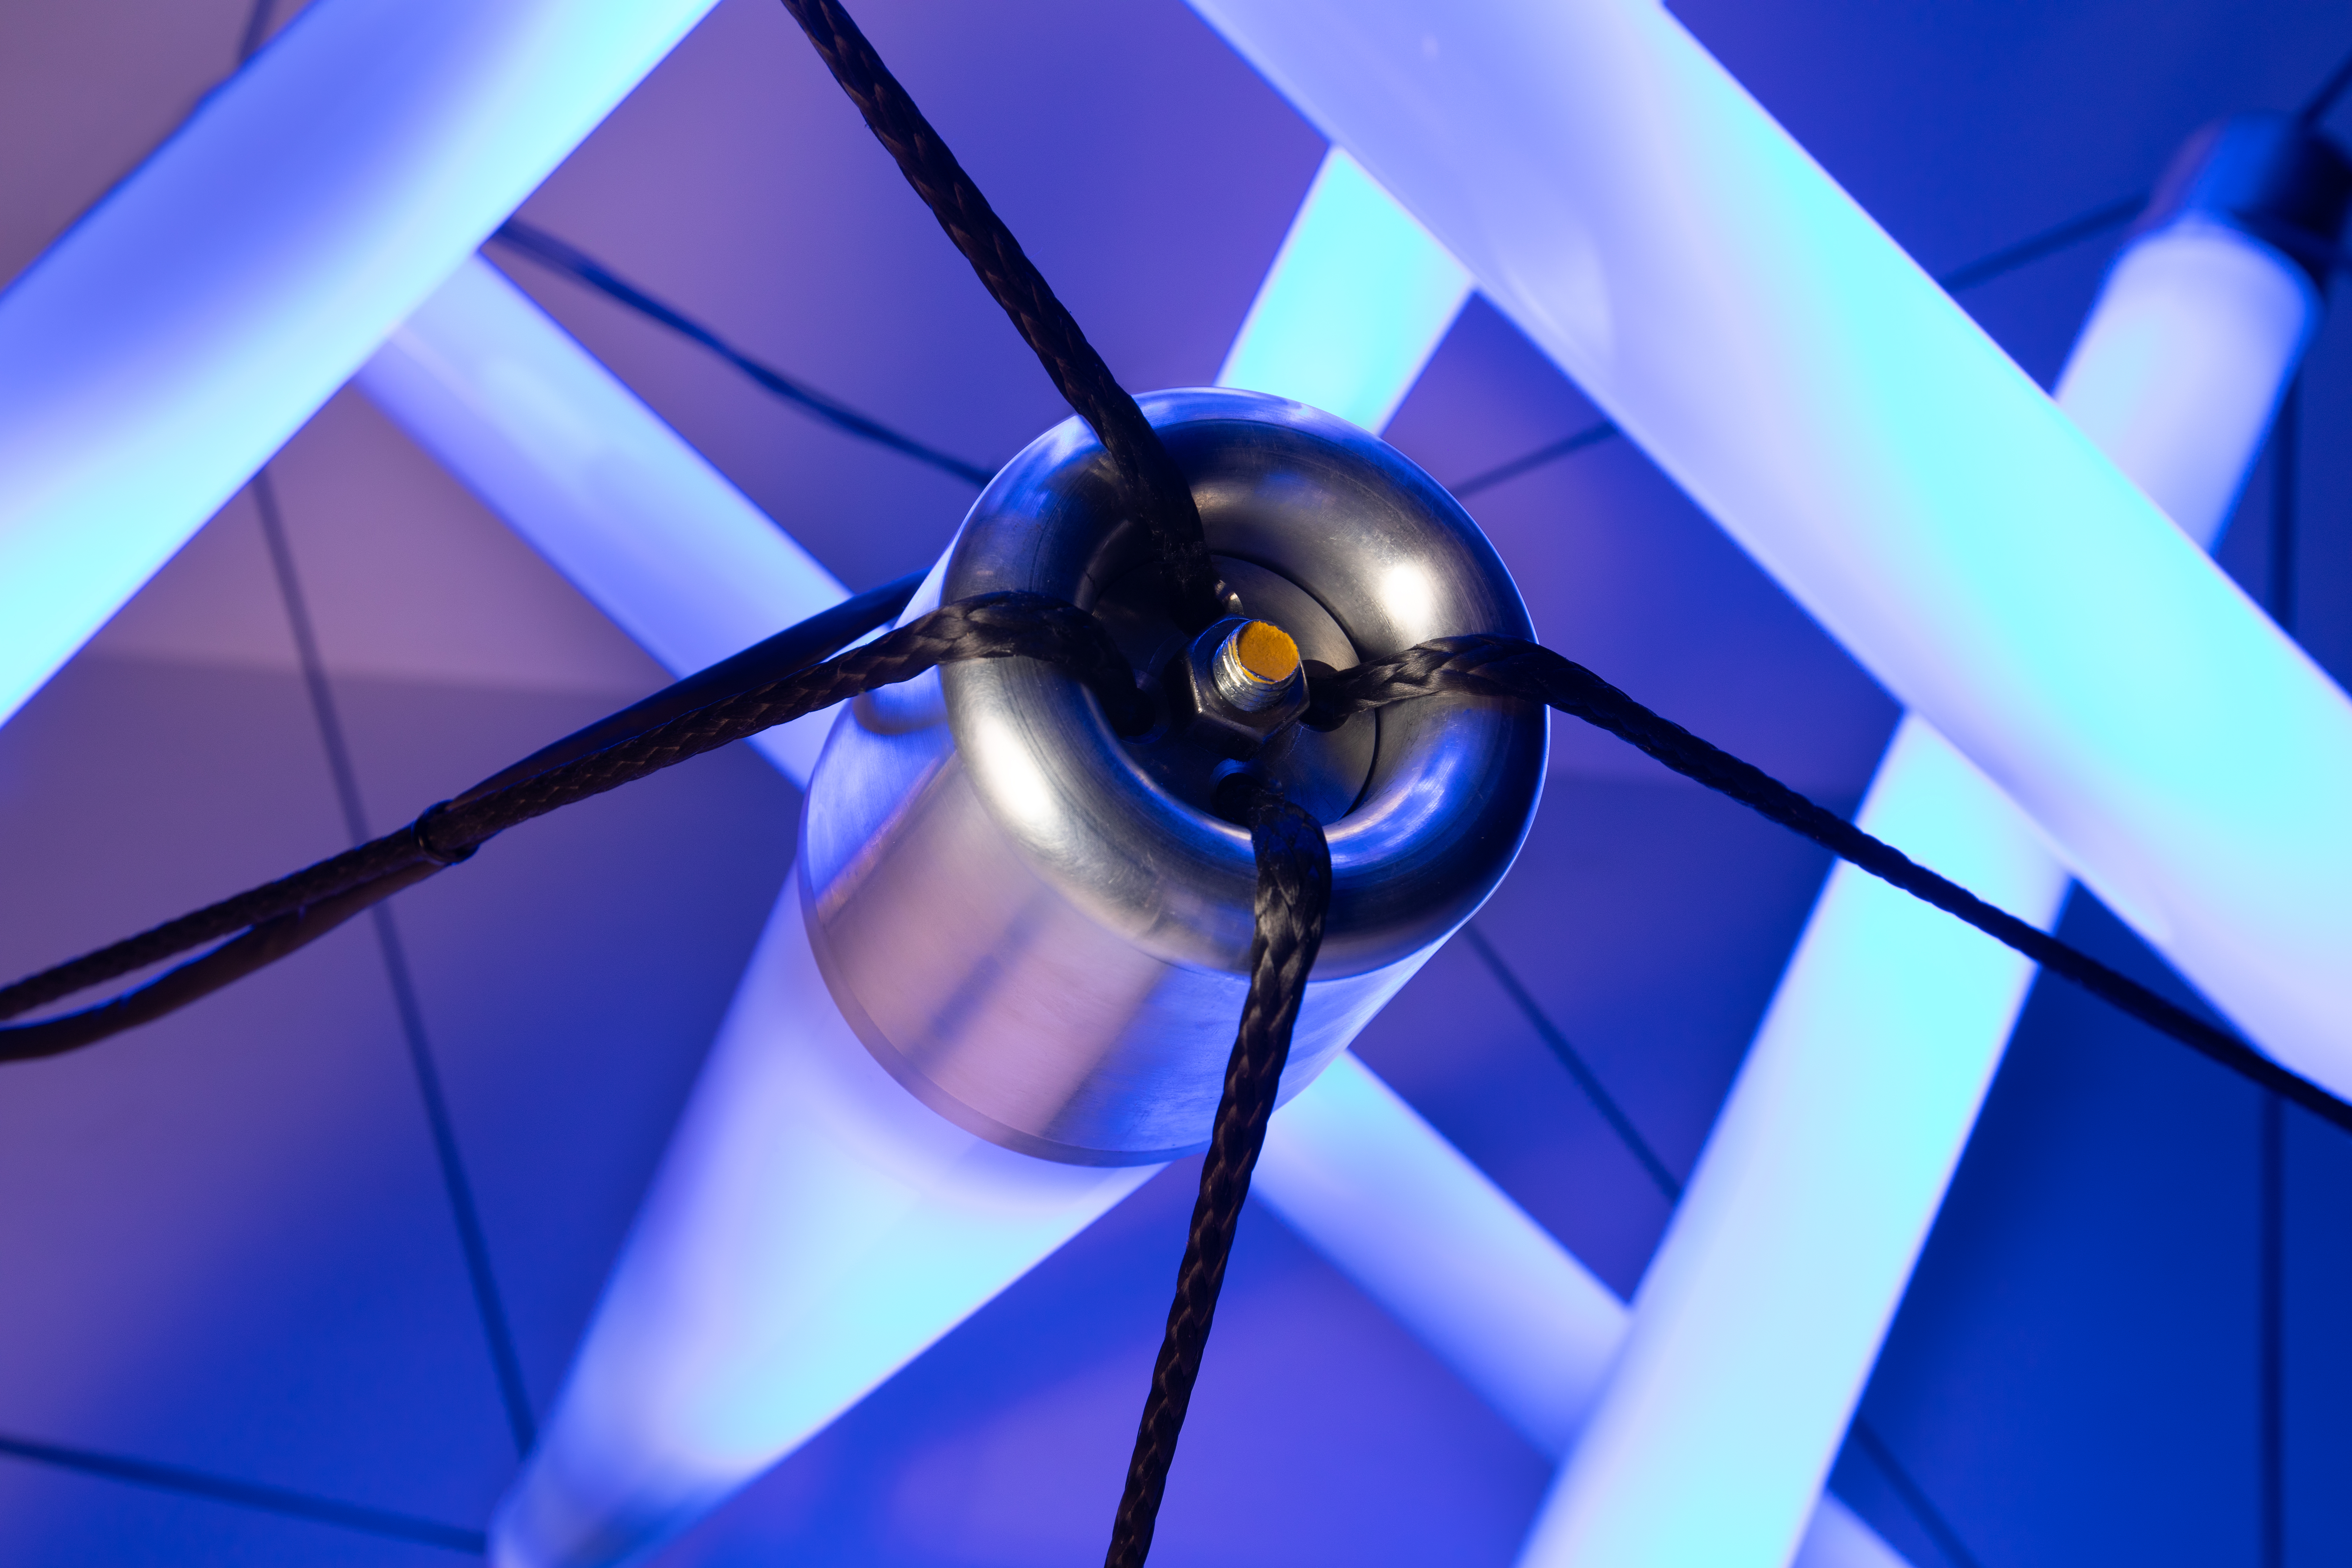
Ate worked out his idea for the glass tubes and machined aluminum endpoints where the tension lines would be pulled into the end by turning a nut.
They accepted our proposal and we started getting ready.
Something for in our hands
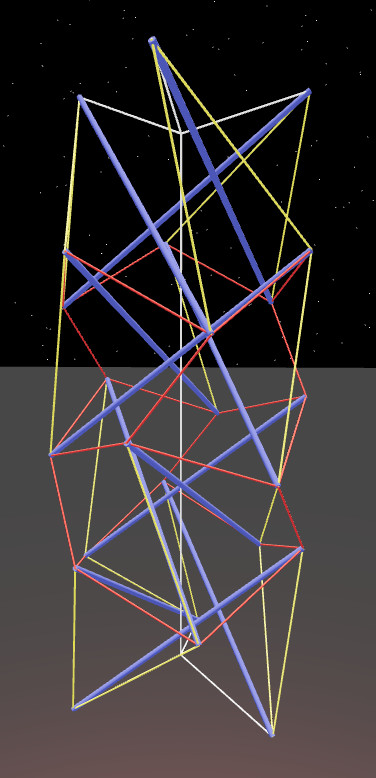
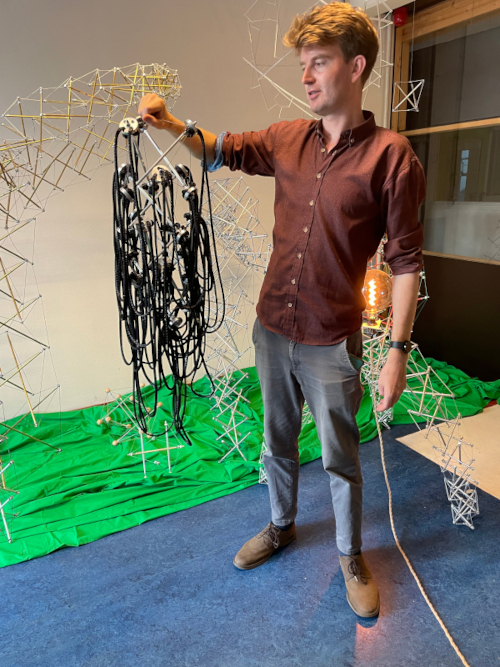
There was some geometry that we all needed to get a better feel for, so I quickly put together a scale model using my existing bag of tricks.
We ended up using this model a lot during the building process so that we were clear about the orientations of each of the bars as we were inserting them, because nothing beats 3D to understand 3D.
It even found another useful purpose which you will see below.
A prototype almost at scale
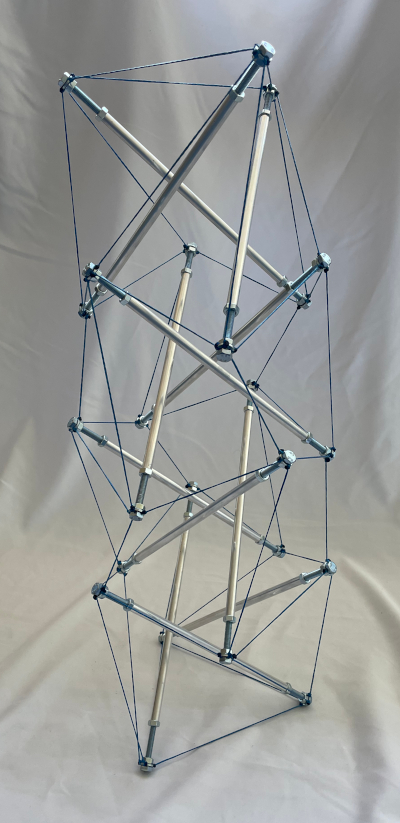
As a civil engineer, Joël was not so easily convinced of the technique for pulling the tension lines into the end and was wisely compelled to put together a prototype using PVC pipe and some other clever techniques.
prototype.mov from Get Pretenst on Vimeo.
He felt that we had to get a feel for how the building process felt, and how the structure moved at that scale
This was an excellent first experience to prepare us for the real thing.
Building tension
Ate and I set about doing the PretenstT thing at my studio, using my hot knife and some impromptu (perfectly appropriate!) aluminum heat shield technology.
We started cutting the cord into carefully measured segments and using the blowtorch and heat shield so unbreakable knots could be made and the perforated aluminum discs could be connected.
As you can see here, this was another useful application of the model that I had made earlier because when we attached the discs to the model, it became much easier to avoid becoming confused while attaching the cords.
The end result was a big (but organized!) tangle of 6mm Dyneema cord, tension complete!.
First time build
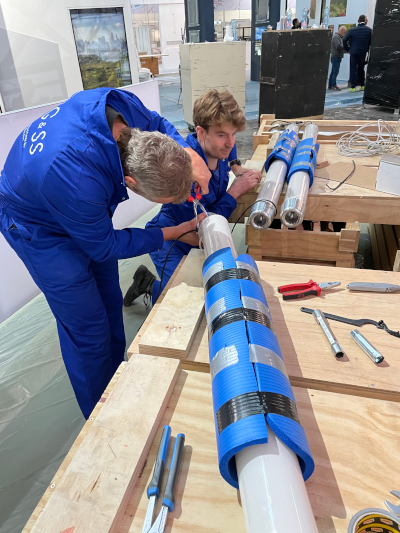
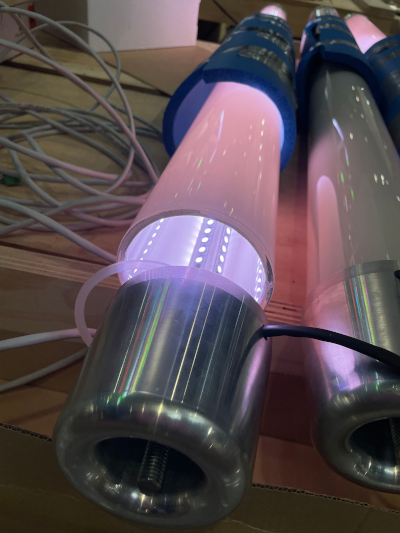
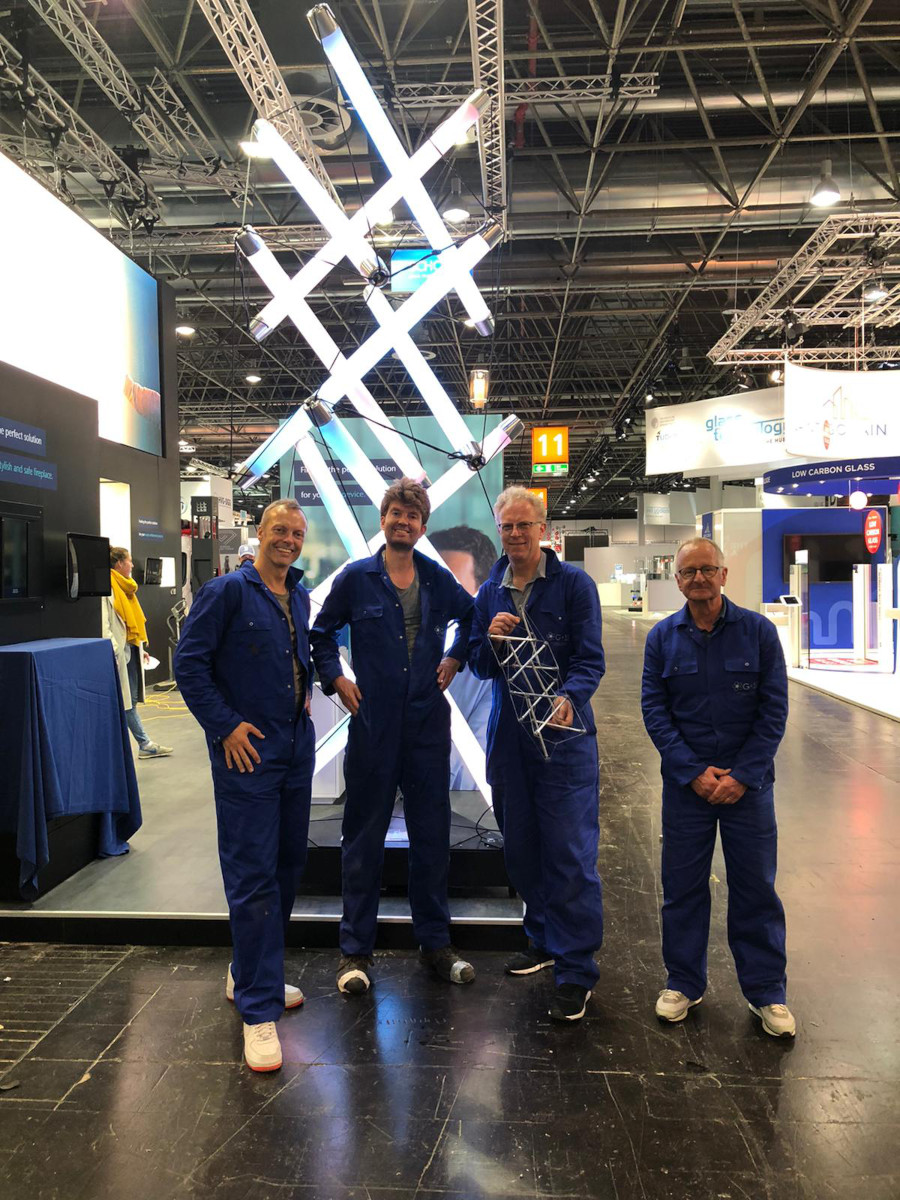
The glass tubes were being assembled with LED light by Wouter Verhoeven who has a company called Proliad.
He was the one responsible for the LED lighting in the glass tubes, and thankfully he and Rob Nijsse also helped us assemble the tower for the first time because we needed all the hands we could get!
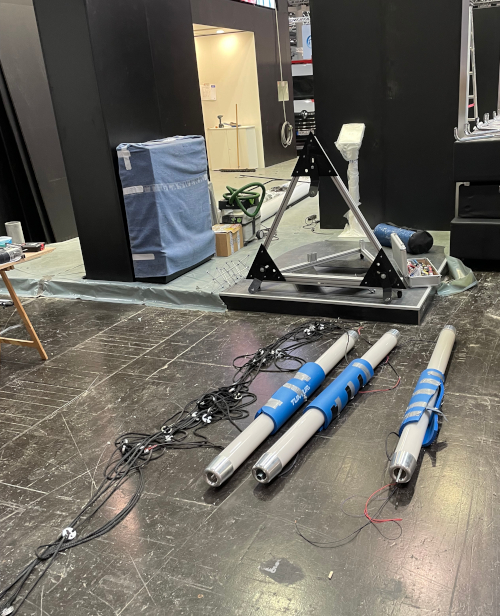
Ate had arranged for some people in his network to build a beautiful triangular base with a hinge, which would be needed to house (and hide!) the computers and power supplies.
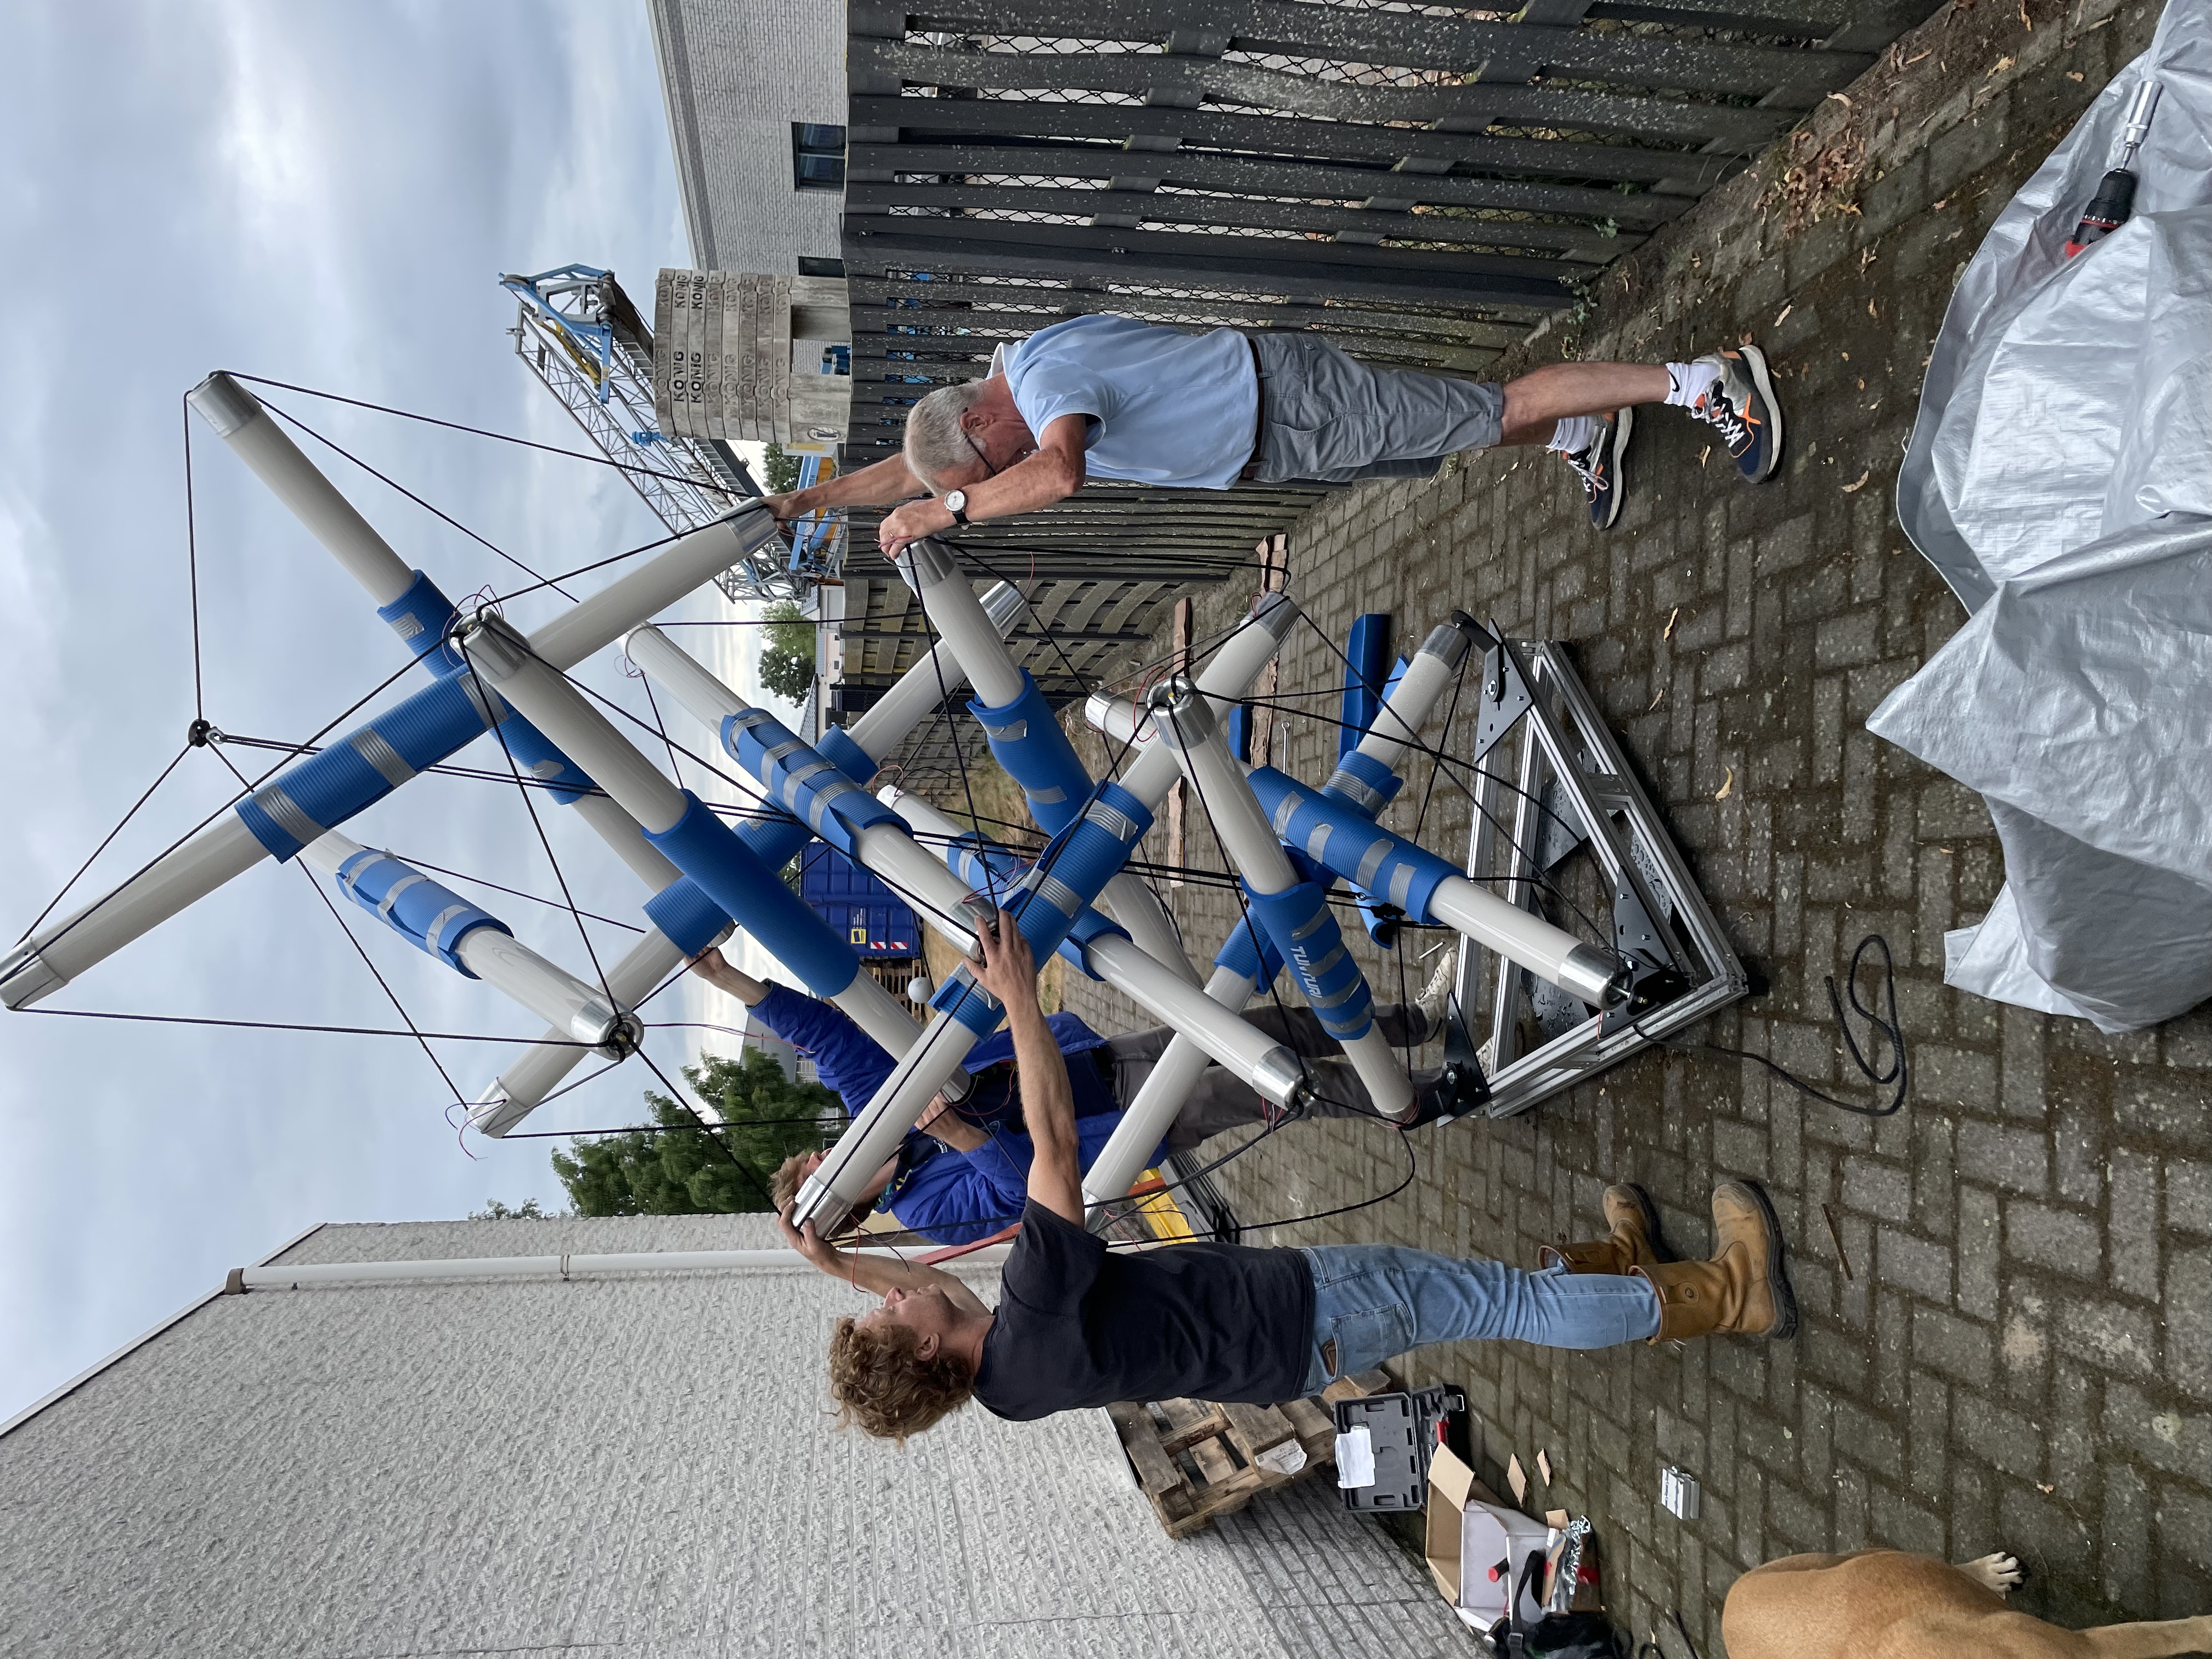
It didn’t really stand by itself without us holding it up. Each of those glass tubes is more than 10kg!
This was almost a little scary, because this big thing had to stand tall without even a suggestion that it was unstable when it finally stands at the Glasstec show.
Second time build on the lawn
We went back to the studio and prepared for the next build by shortening all the cables which were part of the horizontal zigzag rings.
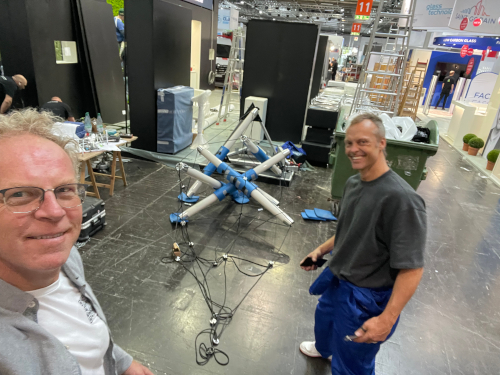
Then we went right back for a second try but this time in the middle of the lawn.
It took some time to get it right, but eventually it stood proud as twilight approached, and Wouter could wire up the LEDs and turn it on!
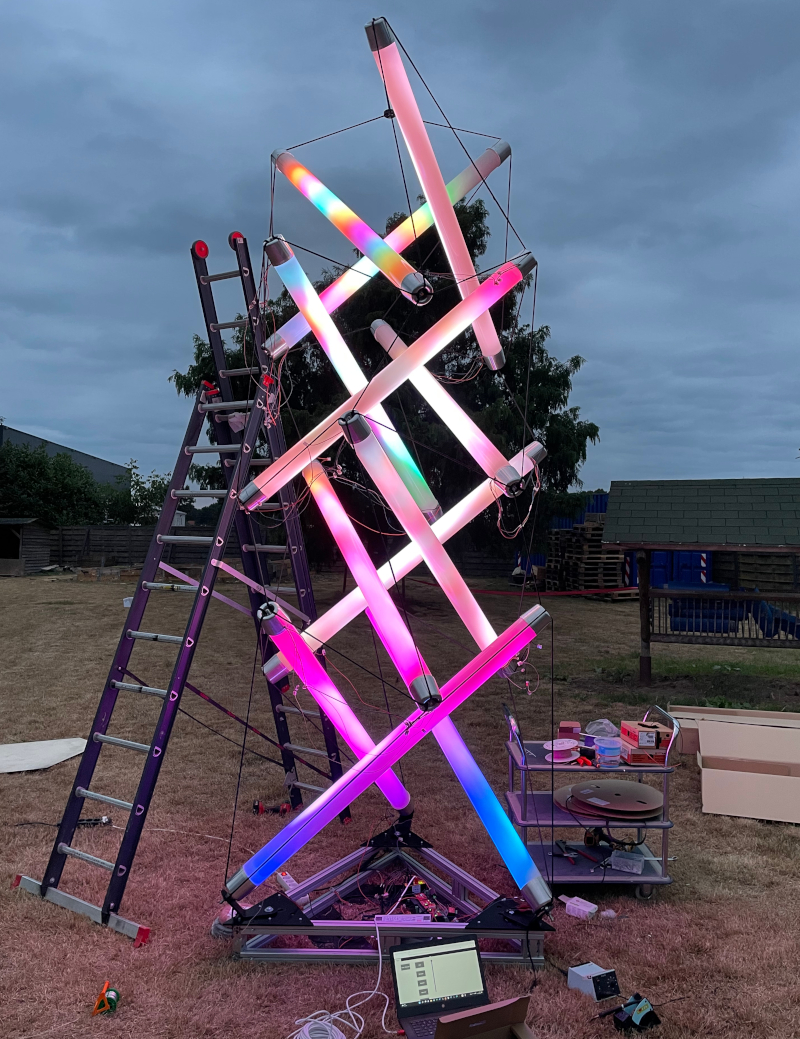
This was quite a breathtaking experience, and we couldn’t help but stand and stare, and walk around to see it at different angles.
Full of confidence, we disassembled the tower and put it away for next time.
It was amazing to see something that big and heavy held up by tension, and above all to see that it was unambiguously working according to the principle I started with in the beginning: prefabricated tension
We just packed up the tension in a bag, and stacked the compression for transport.
Third time build for the photographer
We were getting better at assembling the structure from separated tension and compression, so the next time we put it together for the photography session went much more easily.

This scenario allowed for some very nice close-ups of the parts
It was important to capture the scale of the thing.

Pack it up again, boys!
Off to Düsseldorf
Finally, the time had arrived that it had to be built up again in Düsseldorf for the Glasstec show.
We had all the glass tubes protected with a bit of yoga mat, so that when we put it together we could avoid glass-on-glass.
Here, the tension is still separate.
Working with Joël, we inserted the first few bars in the huge show hall, while everyone else was also building up their elaborate displays.
Things did not go off without a hitch!
There were some problems with the signal wires of the LED strips, so the team had some serious last-minute problems to figure out.
This involved some intricate disassembling, fixing, and re-assembling the glass tube constructions.
Inside every glass tube was a square profile aluminum bar with LED strips along each side.
They had even made a poster with pictures, along with the rather speculative Blender renderings I had made from my more complicated constructions.
There was a lot of work to do getting all the wiring back in place, and it would have been a lot quicker if things had not gone wrong within the tubes themselves.

Ultimately, we were able to get it all upright and tight and lit with the LEDs for the show.
It was a fairly stressful adventure, but a great team.
Conclusion
Mission accomplished!
And absolutely a team effort in which I played just one role.
The most important thing is that the people from Schott AG had a spectacular and peculiar object for the show.
It proved to be a favorite place for many people to take selfies.
Take a closer look:
Now we want to build even bigger and better things. Got an idea? Let me know. pretenst@gmail.com
Projects:
2024-07-23: "Bouncy Wooden Sphere": what you can do with a discarded bed2024-04-23: "Twisted Torque": tied into a permanent twist
2023-03-27: "Easy 30-Push Sphere": one simple element
2022-10-05: "Glass and LED": going big and colorful
2022-09-29: "Fascia": dancing with tensegrity
2022-08-30: "Mitosis": the four-three-two tensegrity
2022-08-04: "Push Bolts for the People": finalizing design and getting it out there
2022-06-22: "Head to Head Push Bolt": M5 and M6 bolts symbiosis
2022-05-30: "Hiding Knots": bump up the aesthetics
2022-05-25: "Innovation with 3D Printer": the push bolt
2021-12-02: "Headless Hug": breaking a rule for the sake of symmetry
2021-10-28: "Rebuilding the Halo": finally got it right
2021-10-20: "Convergence": growing and reconnecting
2021-07-27: "120-Strut Brass Bubble": taking the next step up in complexity
2021-05-26: "30-Strut Brass Bubble": bouncing spherical tensegrity
2021-04-08: "Bow Tie Tensegrity": better bend resistance
2021-03-29: "Six Twist Essential": what if more hands could see?!
2021-01-25: "Minimal Tensegrity": no more tension lines than absolutely necessary
2021-01-18: "Degrees of Freedom": first adjustable hybrid tensegrity
2021-01-11: "Fractal Experiment": a tensegrity of tensegrities
2020-12-09: "Axial Tension": pretensing what is already pretenst
2020-11-02: "Halo by Crane - Part 2": the strengthening
2020-10-26: "Halo by Crane - Part 1": assembly complete but strength lacking
2020-10-12: "Brass and Tulips": a tight and strong tensegrity tower
2020-08-10: "Prefab Tension Tower": the tower of eight twists
2020-07-27: "Elastic Bubble": building with elastic ease
2020-07-13: "The Twist Sisters": left-handed and right-handed
2020-07-06: "Radial Tension": Pulling towards the middle
2020-06-22: "Diamond of Tension": Four pulls for every push
2020-06-15: "Prefab Tension": Separating compression from tension